A bar can look finished on the drawings and still seat people badly. The seats sit too high for the top, elbows collide, and the two stools at the end are unusable because a wall is in the way. Almost all of that comes down to three numbers you can lock in before anything is ordered: the seat height, the spacing between seats, and the clearance around each stool. Get those right and a custom run of branded stools will fit the room and stay comfortable through a long shift.
Match the seat height to the surface first
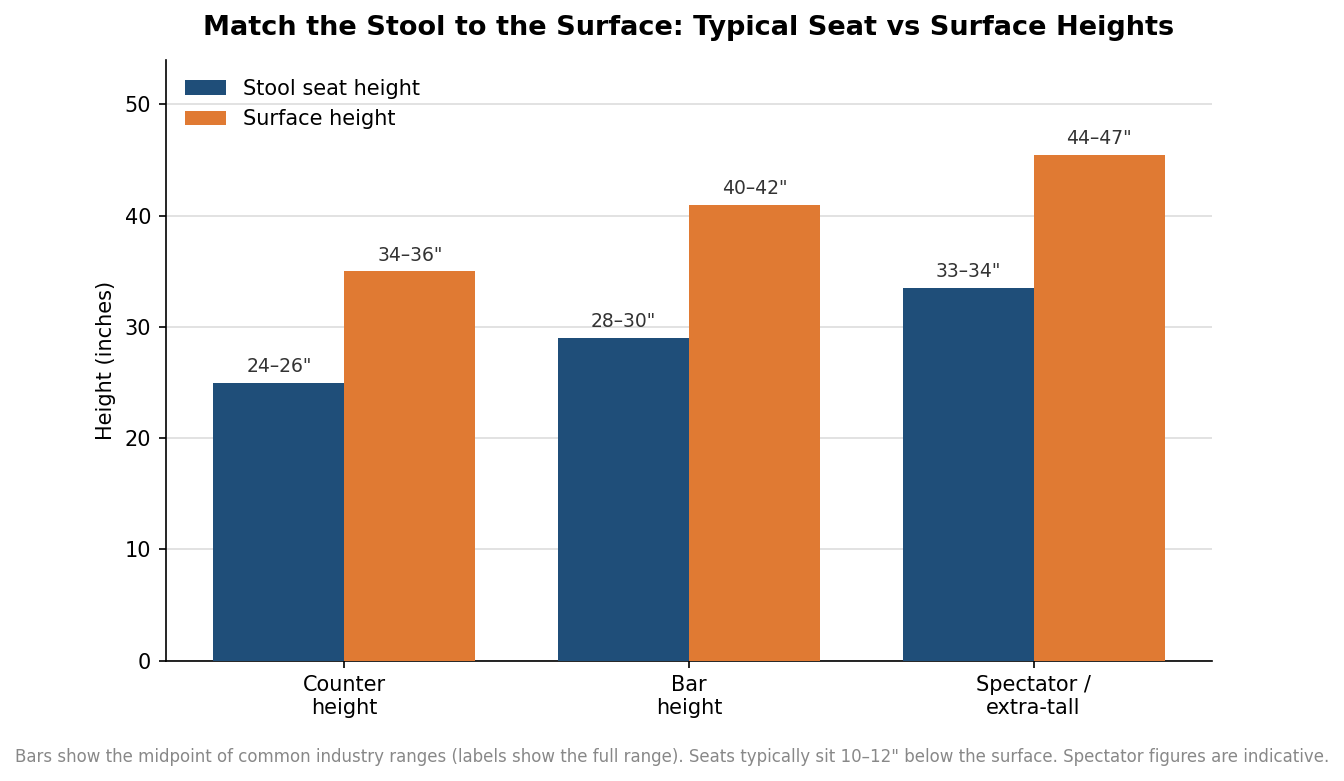
The surface height decides the stool, not your preference. Standard kitchen and reception counters run 34 to 36 inches, and they take a counter-height stool with a seat around 24 to 28 inches; most land at 24 to 26. A true bar or high-top surface runs 40 to 42 inches and needs a bar-height stool with a seat of 28 to 30 inches. Taller spectator or pub tables in the 44 to 47 inch range call for extra-tall stools with seats near 33 to 34 inches; treat those spectator figures as indicative, since they vary more by maker.
The reliable rule underneath all of this is the gap between the seat and the top. Aim for the seat to sit roughly 10 to 12 inches below the surface, which leaves about 9 to 12 inches of legroom between the seat and the underside of the counter. If a guest’s knees hit the apron under the top, the stool is too tall for that surface no matter what the label says. Measuring the finished surface height, rather than assuming it from the cabinet spec, is the single step that prevents the most reorders.
Give every stool its own 24 inches
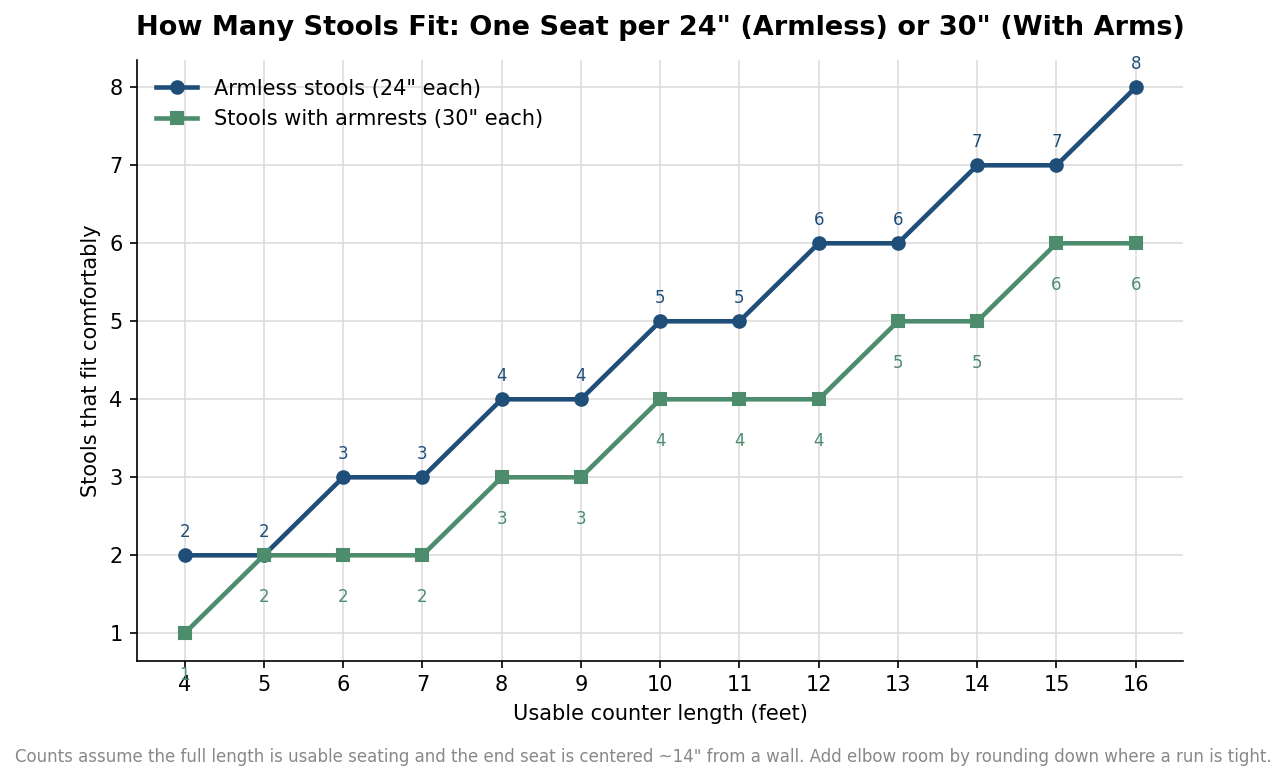
Plan one armless stool for every 24 inches of usable counter, measured center to center. That works out to roughly one seat per two feet of bar. Stools with armrests need more room and should be spaced about 30 inches apart so the arms clear. Between the seats themselves, keep at least 6 inches for elbows; 8 to 10 inches is where it stops feeling cramped. To size a run quickly, divide the usable length in inches by 24 for armless stools or by 30 for models with arms, then round down.
An eight-foot run, for example, is 96 inches, which divides into four armless stools with comfortable spacing or three stools with arms. Where a run ends at a wall, center the last seat about 14 inches off the wall so nobody is wedged into the corner. It is better to seat one fewer stool than to line them up shoulder to shoulder, especially in a commercial setting where turnover depends on people actually wanting to sit there.
Leave room behind the stool, not just under it
Clearance behind the seat is where layouts quietly fail. A counter overhang of 10 to 12 inches lets seats tuck partly underneath, and you want 12 to 18 inches of knee space so legs are not pinned. Backless and saddle-style seats, usually around 12 inches deep, tuck the cleanest and are worth considering where floor space is tight or where stools need to disappear under the counter between services.
Behind the row, allow about 24 inches from the counter edge so a person can pull the stool out and stand. If that same space doubles as a walkway for staff or other guests, add a real traffic aisle on top of it, on the order of 30 to 36 inches, so someone getting up does not block the path. These are the dimensions that separate a bar that photographs well from one that works during a rush.
Build in at least one accessible seat
Public-facing bars should include an accessible section, and it is cheap to plan for up front. Accessibility guidance points to a portion of the counter at 34 inches high and at least 36 inches of clear width, with knee clearance beneath it in the range of 27 inches high, 30 inches wide, and 19 inches deep. Meeting that usually means leaving one open stretch of lower counter rather than buying a special stool, so it costs layout planning more than money. Even a home bar benefits from one lower, easier seat for guests who do not want to climb onto a 30-inch perch.
How the layout changes what you order
Once the spacing is set, the rest of the specification follows from it. Backless stools maximize how many seats you can tuck into a short run and keep sightlines open, while stools with backs are more comfortable for longer sitting but eat into your spacing and need the wider 30-inch pitch. Swivel seats suit tight rows because guests turn instead of scooting the whole stool out; fixed seats are steadier and simpler to keep aligned. A footrest at a consistent height keeps the row looking uniform and takes strain off the legs.
Branding placement is a layout decision too. On stools with backs, the outer face of the backrest is the panel people see from across the room as they walk in, which makes it the natural home for a logo. On backless stools there is no back to print, so the seat apron or a footring band becomes the visible surface. Deciding seat style and spacing before you commit to a custom print run means the artwork lands where it will actually be seen, at a size that reads from across the room, rather than being squeezed onto whatever surface is left over.
Work in this order and the project holds together: measure the finished surface height, pick the matching stool height, divide the length by 24 or 30 for your seat count, then confirm the clearance behind and one accessible stretch. Every later choice, down to where the logo goes, gets easier once those numbers are fixed.